Google Cloud, also sometimes referred to as the GCP (Google Cloud Platform) is a cloud computing platform that offers hosting, storage, and a wide range of services to deploy and manage applications (Kubernetes, VMs, Serverless functions …).
You have access to it through the console.cloud.google.com website and the CLI (Command Line Interface) gcloud to
manage your deployments and application.
In this article, we’ll look at how to get set up with the Google Cloud CLI and some useful tips to get started.
CLI Set up
Installation
Find the installation guide on cloud.google.com, download the google-cloud-cli package for your distribution.
Extract it, and move the file to a proper place as it’ll be added to your path once installed (like in usr/locale).
Then run within the extracted folder google-cloud-sdk, the installation script:
sh install.sh
If Python is not installed, it will prompt you to do it. Once installed, you can open a new terminal
or source your rc file (e.g. ./zshrc) to get access to the glcoud command.
Once installed, you can read the commands available with:
gcloud cheat-sheet
This will display a man type of documentation with useful gcloud commands and their explanations.
Log in
Once installed, initialize it with:
gcloud init
It will prompt you to log in, which will bring you to an SSO screen to log in with your email address. Then you will set the cloud project to use by default. Optionally, you can set a default compute region, usually you should choose a region that is geographically close to you or the intended user, to reduce latency.
This is the project in which you will create resources, and it determines your usage and billing.
How am I logged in to Google Cloud?
The init will save the credentials in a file in ~/.config/gcloud/.
Get started
You can browse the project and its deployment online through the console.cloud.google.com.
# Find all available projects
gcloud projects list
# Find the current project's id
gcloud config list project --format "value(core.project)"
To see the available projects, if you didn’t set a default one before,
you can do so via gcloud config set project <project>, then you can list the available clusters in that project:
gcloud container clusters list
If you don’t have a cluster, you can create one using gcloud container clusters create my-gke-cluster, you will need
a cluster to be able to create a deployment.
A project is where you can create clusters is a group of nodes (machine running the applications)
which are belonging to the Google Kubernetes Engine (GKE). A GKE corresponds to one Kubernetes (k8s) cluster.
Find out more about Kubernetes in this article.
Deployment
Google cloud has different compute services offerings, we are using the Kubernetes Engine for our deployment.
Via the UI
Via the UI, you can create a deployment by going to the Kubernetes Engine page, then click on the Deploy button. By default, it will prompt you to create a simple nginx deployment:

It’s very straight forward, click next, next, next and ok to get your first deployment up and running. You can try it out, but we’ll see next how to do the same via the CLI.
Via the CLI
From a repository
To deploy an app from an image created through a repository, you will need to have Cloud Source Repositories API, else you will have to use an existing public image (i.e. from DockerHub).
# Assuming you are in a project with a Dockerfile
gcloud run deploy --source .
And it should work flawlessly, unless you are trying to deploy a new image without the correct permissions. Which will give you an error like this one:
ERROR: (gcloud.run.deploy) PERMISSION_DENIED: Permission 'artifactregistry.repositories.create' denied on resource '//artifactregistry.googleapis.com/projects/<project id>/locations/<zone>' (or it may not exist).
# To add the permission (if you have the rights)
gcloud projects add-iam-policy-binding YOUR_PROJECT_ID \
  --member="user:USER_EMAIL" \
  --role="roles/artifactregistry.writer"
If you manage to fix your permissions (You might need to use some elevated access or a different user),
and it still doesn’t work, you will need to either enable it via gcloud services enable container.googleapis.com.
From an image
If you still want to test it out without this permission, you can still try it out with already available images.
So let’s do it with a nginx server instead.
For that, we are going to create a kubernetes context from a cluster, so it deploys in Google CLoud.
First you need the gke-gcloud-auth-plugin authentication:
# First install the plugin
gcloud components install gke-gcloud-auth-plugin
Then you can select an existing cluster or try to create a new one in your project.
If you’ve selected a project before via the CLI (as mentioned earlier), you can skip the --project flag.
# List the clusters
gcloud container clusters list
# Or create a new one
gcloud container clusters create <cluster-name> --zone <zone> --project <project>
Next, you will need to create a context for the cluster, and for that you will need to know the project and the zone you want to create it in. For the zones, if you haven’t selected one, you can choose from the available list:
gcloud container zones list
# NAME                       REGION                   STATUS  NEXT_MAINTENANCE  TURNDOWN_DATE
# us-east1-b                 us-east1                 UP
# us-east1-c                 us-east1                 UP
# ...
Now you should have all the information needed to create your cluster. This cluster is a Kubernetes cluster managed by the Google Kubernetes Engine in the Google Cloud Platform.
# Create the context
gcloud container clusters get-credentials <cluster> --zone <zone> --project <project>
It will update your ~/.kube/config file and add a new Google cloud CLI Kubernetes context to it.
This will allow you to interact with your cloud cluster directly with the kubectl commands.
You can check that it worked using:
kubectl config get-contexts
And you should see the one called gke-<project>-<zone>-<cluser> in there. Use kubectl config set-context <context> to
switch back at any time to another one.
Now you can use the default k8s commands to create your deployment:
kubectl create deployment test --image=nginx:latest
kubectl expose deployment test --type=LoadBalancer --port 80 --target-port 8080
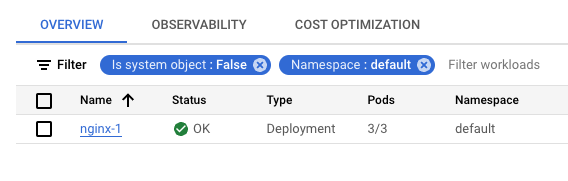
And now if you check online, in the gcloud console, you’ll see your deployment. It might take a few seconds for it to be totally up and running.
Now if you execute a command locally via kubectl to scale up/down or change the deployment in any way,
you will see that the “local” (but not so local because it’s actually running in GCP) changes are reflected in the cloud console.
With multinode autoscaling
To enable autoscaling in Google Cloud, you need the “Kubernetes Engine Cluster Admin” role to modify a cluster’s settings. Then run the following command:
gcloud container clusters update <cluster> \
  --enable-autoscaling \
  --min-nodes=1 \
  --max-nodes=10 \
  --zone <zone> \
  --node-pool <pool>
The cluster and zone should be the same as the one defined earlier, the pool should be the node pool’s name
of the cluster.
A node is a VM instance in Google Compute Engine, the node pool represents some nodes available in your GKE cluster.
You can have multiple node pools in a cluster, each with different specifications. For autoscaling to work,
you need to enable it on the node pool’s configuration first.
With this configuration the cluster will have autoscaling enabled and will scale between 1 and 10 nodes depending on the workload.
Conclusion
Now you are all set to work with Google Cloud from your terminal, you can create and manage your deployments from there as if it was running on your machine. But remember to kill deployments that you are not using anymore as cloud costs can quickly escalate. If you are worried about the costs, check this article for some best practices using right scaling.