Vue.js is a framework to build user interfaces (UI). It can self contains the required css, js and html into one file. You will see how to get started on the vue.js documentation
But let’s take a look at a full on Vue.js app.
Introduction
Here is what the very basic tree of a vue app look like.
You can see that there are the main app App.vue and then two folders components and views.
.
├── src
│   ├── App.vue
│   ├── components
│   │   └── MyComponent.vue
│   ├── main.js
│   ├── router.js
│   └── views
│       └── Home.vue
└── tests
    └── unit
        └── MyComponent.spec.js
To Better understand how vue works, it build a page based on the app which is based on a view which is based on components.
All of those elements are .vue files, vue.js has a very good picture describing it:

In your vue app, you try to decompose everything in simple reusable and testable components. Those components can also be easily tested with js and it make your application more flexible and robust overall. Here we’re going to see what a simple component would look like.
Reactivity
So a vue component is build with html, css and javascript.
The html part was using some custom ‘directive’ like v-if or v-model allowing to do some templating
with simple logic in them.
The common css can be in a different file, and the specified css can be put in the vue file.
Then we have the javascript that describe the behaviour of the component. Usually it implies changes on the data presented on the component or what gets visible.
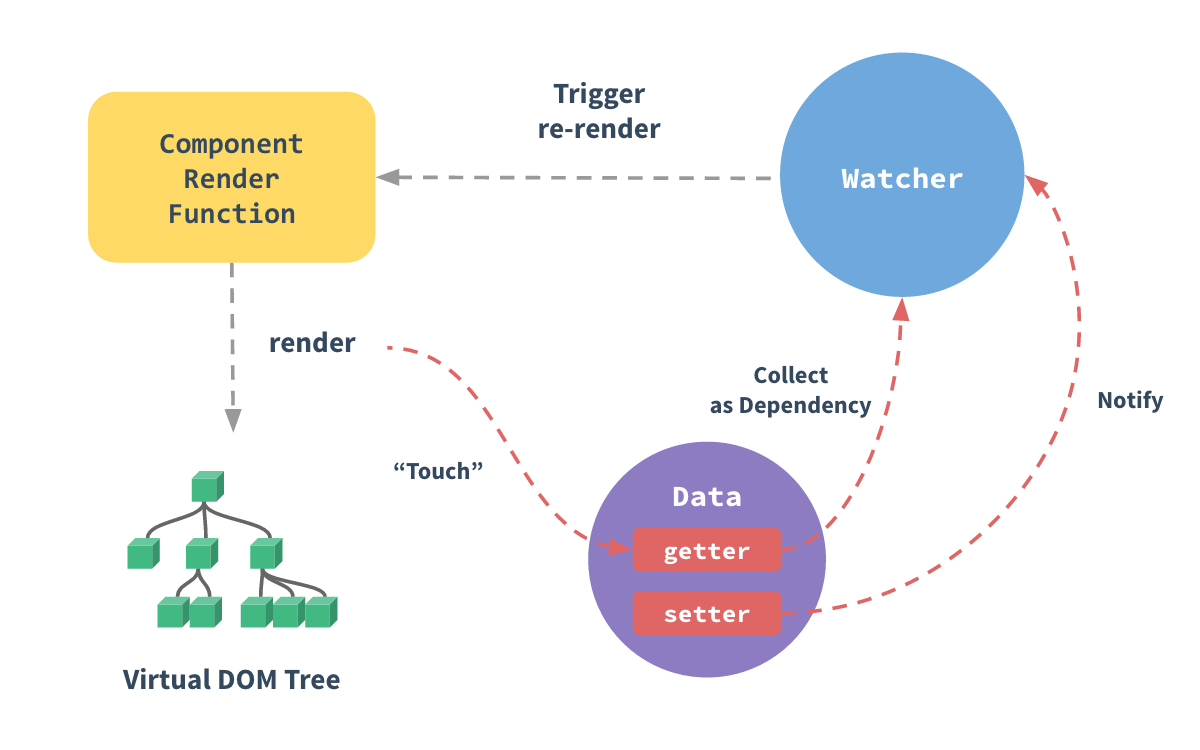
Here is a schema of how vue.js handle it and get reactive:

Vue Component
Building your component
Let’s get into MyComponent.vue, a basic component, first the html part:
<template>
  <div>
    <div class="message">  </div>
    Enter your username: <input v-model="username">
    <div v-if="error" class="error">
      Please enter a username with at least seven letters.
    </div>
  </div>
</template>
You can see the < template > tags that make up the vue html template. Some of those template attributes are:
{{ message }},{{ msg }}: define a variable that will be replaced at run time by a value in the js.v-model="username": which will map the input to the username value define in the jsv-if="error": which is a computed value from error, this div will appear when error() returns true
Here is the js part, where you define everything that is used in the html template:
<script>
export default {
  name: 'Foo',
    props: {
      msg: String,
    },

  data() {
    return {
      message: 'Welcome to the Vue.js cookbook',
      username: '',
    };
  },

  computed: {
    error() { return this.username.trim().length < 7; },
  },
};
</script>
In the props, there are the values like msg you can push to your component when using it from another component.
So you could see that data is where you define the variable that are used in the template.
And computed defines variables that gets computed during usage, thus dynamic.
Use your component
Now that you have your component, you can use it in another vue component. Here is how it would look in another component:
<template>
  <div class="home">
    <MyComponent msg="... Hey!"/>
  </div>
</template>

<script>
import MyComponent from '@/components/MyComponent.vue';

export default {
  name: 'home',
  components: {
    MyComponent,
  },
};
</script>
Here you can see another component in which we import MyComponent from our component folder.
You can see the custom tag < MyComponent ... >, and for it to work you need to declare MyComponent in your export of the component.
Test Vue Component
In order to test your component you would need to use ‘@vue/test-utils’ and “mount” your component. Once mounted you can interact with the component. Here I am also using jest for the assertions.
import { shallowMount } from '@vue/test-utils';
import Foo from '@/components/MyComponent.vue';

const factory = (values = {}) => shallowMount(Foo, {
  data() { return { ...values }; },
});

describe('Foo', () => {
  it('renders a welcome message', () => {
    const wrapper = factory();

    expect(wrapper.find('.message').text()).toEqual('Welcome to the Vue.js cookbook');
  });
});
And here we can test some basic static information in our component, but you can also test the error that should disappear when more than 7 letters are inputted.
  it('does not render an error when username is 7 characters or more', () => {
    const wrapper = factory({ username: 'example-01' });

    expect(wrapper.find('.error').exists()).toBeFalsy();
  });
You can see that you can pass data in your factory, here we’re passing a bigger 'example-01'
as a username.
And you can assert that the .error div should not be visible.