React is a well known javascript library for building user interfaces. React is part of the Facebook Open source, and has a very good documentation to learn 📚!
You can get started with your own React application using Create React App. It is a boilerplate app creator, you can use it via:
npx create-react-app <your app name>
And here you go, a folder with your app name has been created, and you can start running the default page!
Concept
If you want to know a bit more about the history of React, like it is coming from the idea behind XHP (XML with PHP) since Facebook was written in PHP at the time. Then I suggest you check this talk from Lee Byron: Let’s program like it’s 1999 from React Conference 2019.
React, JSX and Components
Like other libraries or framework out there, UI components are abstracted part of the UI encapsulating their own logic (in javascript) and view (HTML markups). They make designing UI easier with flexible re-usable parts.
React uses something called JSX (Javascript XML), to intertwine logic and HTML markup which The example given is:
const element = <h1>Hello, world!</h1>;
It is a perfectly valid React component, there’s no real logic into it. However, it’s mixing javascript notation with HTML markups, so some people hate it, others love it. When used in a browser with some “new javascript”, React components may not always be understood by the browser.
That’s why there are some “compiler” like babel that transforms it into a more “vanilla javascript”
To bring it back to our point. The concept is fairly simple, React will compute the DOM (Document Object model, the web page) based on the component logic and markup and rewrite the updated parts.
Render with ReactDOM
Here would be another example of how to render something with React if you haven’t already checked the other ones on the React doc First we’ll define another tiny component that takes a parameter:
const Greeting = ({ greeting }) => <h1>{greeting.text}</h1>;
Great, it will render the text into what’s commonly known as a title with the <h1> markup.
To render it we would do:
import React from 'react';
import ReactDOM from 'react-dom';

ReactDOM.render(
  <React.StrictMode>
    <Greeting greeting={{ text: 'Welcome to React' }} />
  </React.StrictMode>,
  document.getElementById('root')
);
As of React 18,
ReactDOM.renderis deprecated, and you can usecreateRoot(root).renderinstead fromimport { createRoot } from 'react-dom/client';
That means, ReactDOM will look for an element with the root id and attach our component to it.
The React.StrictMode helps you write better components by highlighting in the console any potential error generated by the underneath components.
In the end, it will amount to something like:
<div id='root'>
    <h1>Welcome to React</h1>
</div>
That’s how your react JSX gets integrated and rendered in the DOM. And now it is time to dive further into the possibilities of React components.
React Component
While exploring React and stumbling upon issues, I came across Robin Wieruch’s blog, and it is full of nice articles on how to do about anything in React 👌 so check it out for some real cool stuff. Now let’s see how to write some components.
Vocabulary
Here is to lay out some vocabulary around components that are peculiar to javascript or React. So let’s just add some simple definition on those:
- props: Props are like the parameters you pass down a function, or component. It stands for property. In React, they must be read-only you don’t modify the props directly.
- state: Talking about stateful and stateless, state represents the current value(s) of a component. The state is like a “private member” and can’t be updated directly.
You need to use something like
setState()so each time you update the state, it will render your component with its new value. - lifecycle: This is handling of the React component that will go through different stages from before it appears in the DOM, to being updated until after it gets removed. The React component API provides methods to control the behavior in each of those stages
There’s a nice interactive diagram available online that shows the common lifecycle.
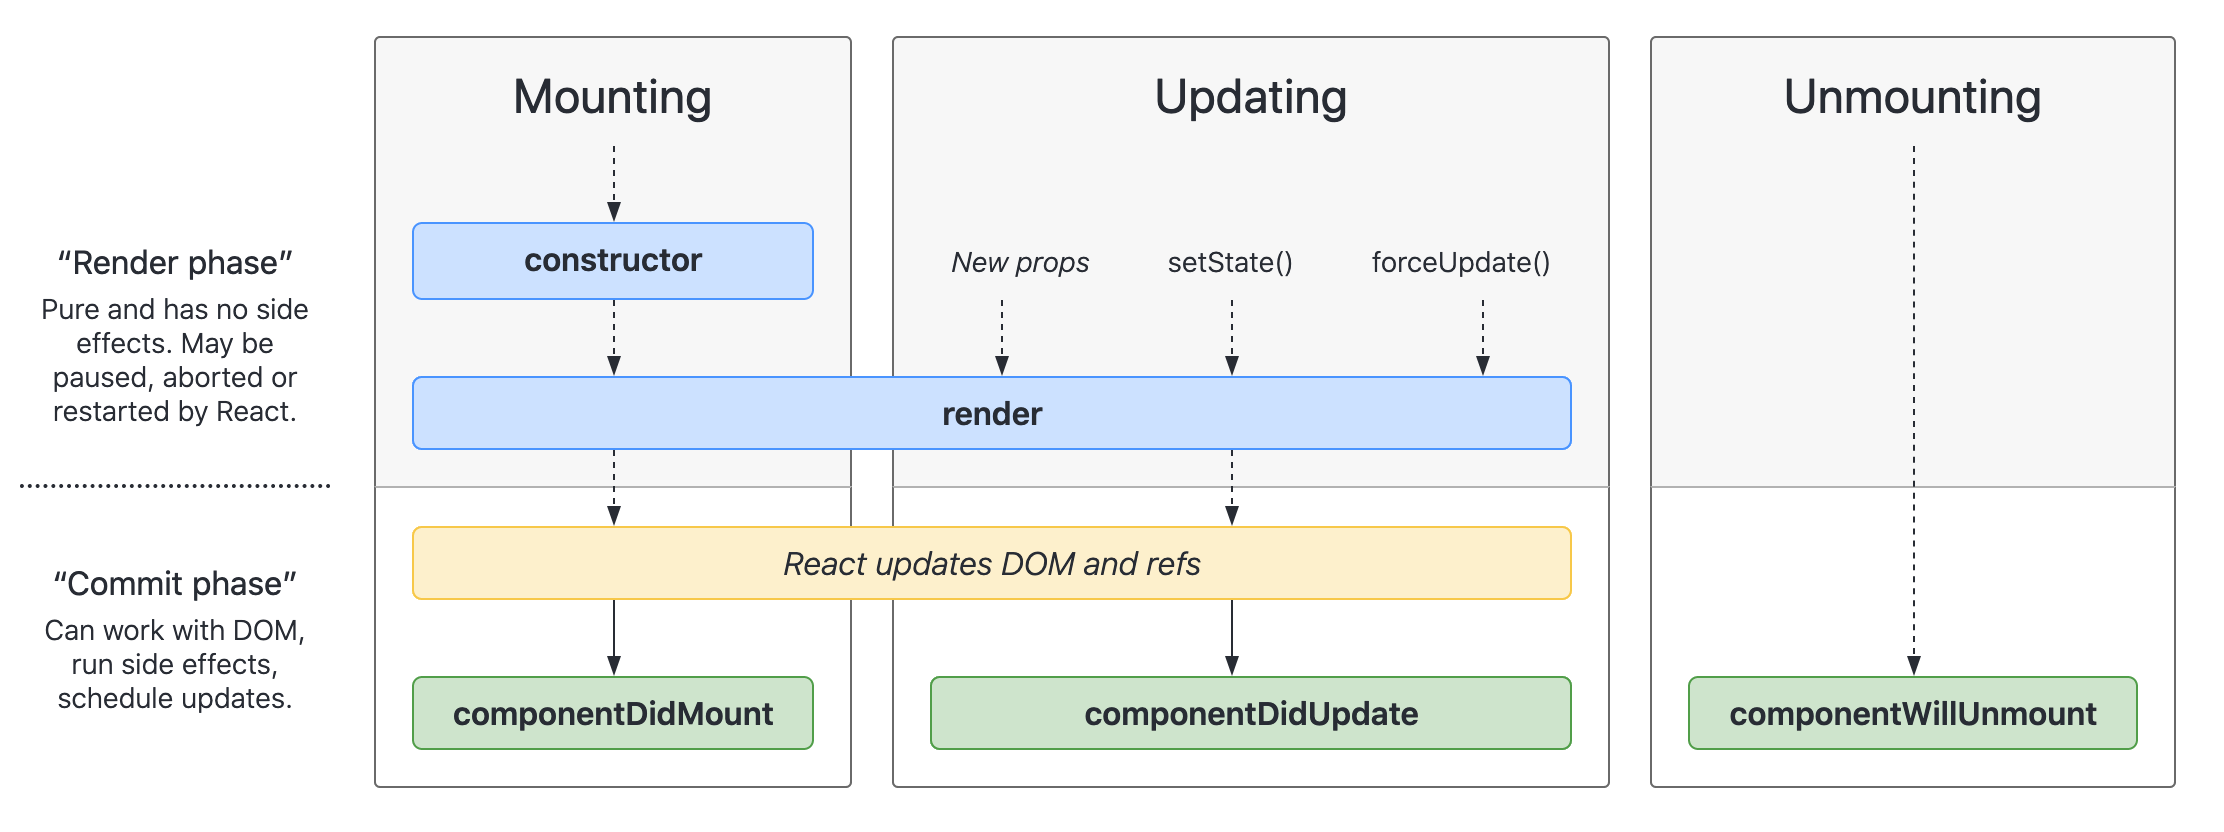
As you can see, those are the main steps, but there are also some less commonly used lifecycle steps for advanced usage. Now that we have more perspective, let’s dive into the main component types and see how it works together.
Functional components
Usually, those components are pretty straightforward and require little logic to them. They leverage the abstraction / encapsulation permitted by react to reduce the size of bigger component by breaking them down into small pieces. With dumb components that bare no logic like:
const HelloWorld = () => <p> Hello World! </p>
Or if you remember in the first part; the Greeting above was another example of a very simple functional component.
Using React hooks you can make your component more intelligent:
import React, { useEffect, useState } from 'react';

export default function FunctionalComponent() {
  const [value, setValue] = useState('default value');

  useEffect(() => {
    fetch('https://jsonplaceholder.typicode.com/posts/')
      .then(res => res.json())
      .then((result) => {
        setValue(result[0].title);
        }
      )
  }, []);

  return <p>{value ? value : 'not received'}</p>
}
This component uses the useEffect hook to update itself (via fetching some info) and we use the useState hook to create and save the state of the component.
You can also have a high-order component when, for example, you have a list of data for which each will be rendered via another component. So once you’ve mastered the syntax, you’ll be able to go fancy with those.
Class Component
The class component makes up for a more controlled (handle props, state and lifecycle methods) and verbose component. Here is an example component with its most used capabilities:
export default class ClassComponent extends React.Component {
  constructor(props) {
    super(props);
    this.state = { value: 'default value' };
  }

  componentDidMount() {
    console.log('I was mounted on screen');
    this.setState({ value: this.props.value });
  }

  componentWillUnmount() {
    console.log('better do some clean up to avoid a memory leak')
  }

  render() {
    return <p> Render my {this.state.value} </p>
  }
}
The props and state gets to be managed within the constructor. And you have access to the lifecycle methods, those methods are called automatically. A component is said to be mounted when it’s in the DOM.
You can use this component easily passing down some props name value using:
<ClassComponent value={'props value'}/>
Let’s follow how the props get handled:
- You can see that
value={'props value'}is being passed to the component when using it. - The
propsthat get passed to the constructor then looks like that:{ props: { value: 'props value' } } - And the
super(props)will copy this props tothis.propsso we can access it in our component.
You can see how to convert a functional component to a class component on the react doc. The best way to learn is always to try it out by yourself, so let’s get coding 👩💻👨💻!